Unlocking Rubik's Cube
Okay! Let me start by getting you familiar with the notation that will be used throughout. The Cube has 6 faces, out of which only 4 will be labelled as shown below, that is, Front (F), Left (L), Right (R) and Bottom (B).
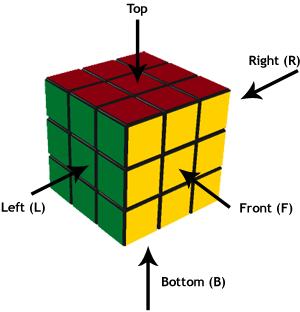
All clockwise and anticlockwise rotations will be denoted by + and − respectively. Carefully verify the difference between R+ (Fig. 1) and L+ (Fig. 2) below. To understand this difference, bring the face in question (R or L) in front of you and rotate it.
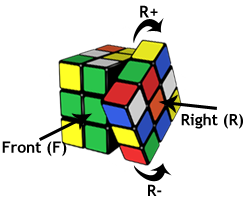
Fig. 1 |
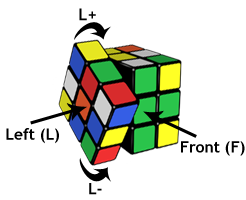
Fig. 2 |

Fig. 3 |
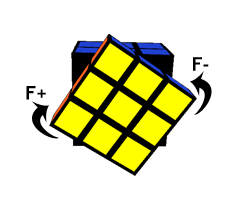
Fig. 4 |
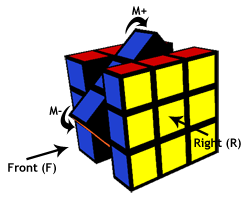
Fig. 5 |
Lastly, in this algorithm, you will also be moving the middle column (M) up and down (see Fig. 5). M will follow the same principle as R, that is, looking from point of view of the right face. In simple words, M+ would mean rotating the middle column 'up' whilst M- implies rotating it 'down'.
There is no specific method for solving this row. In fact, you may find that this is the most time-consuming step in the algorithm! I will just show you the logic behind sending a "little cube" to a desired position.
Fig. 6 shows the case where "little blue square X" is to replace "little white square Y" on top to complete the top face. The code is B- R- B+ R+. Fig. 7, 8 and 9 show the intermediate states, and next moves to be made, of the Rubik's Cube before finally reaching the desired position as shown in Fig. 10.

Fig. 6 |

Fig. 7 |
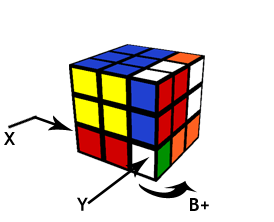
Fig. 8 |
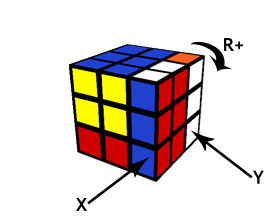
Fig. 9 |
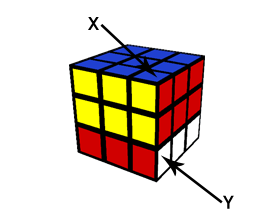
Fig. 10 |
Finally, X takes the place of Y, as required. The same procedure is to be used whether motion is in the middle or left column as well. The first row (or layer) is considered to be solved if the three little squares (of that top row) on each face are of the same colour.
From now on, you will always hold the completed face on top during all your manipulations of the Cube.
Observe the two figures below carefully - you can get going with the second row only if the first row or layer is complete as shown in Fig. 12. In Fig. 11 it is observed that the top face is indeed white but that the 3 little squares labelled A, B and C (indicated by arrows on the side of the Cube) are not of the same colour.
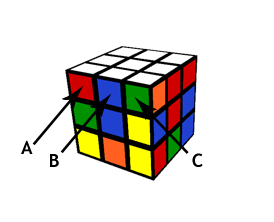
Fig. 11 |

Fig. 12 |
Solving the second row the easiest step in the alignment of a Rubik's Cube! You first rotate the middle row until its centre square is of the same colour as that of the row just above it (See Fig. 12 above). The other centre cubes will be automatically aligned with their respective colours - check it!.
The objective is to 'fill in' the middle left and middle right squares on each face (as the middle centre squares of the second row are already here by default, as shown in Fig. 12 of the previous step). If these squares are not there by chance, then they will always be found at the centre of the third row.
There exists two possibilities: move the bottom middle square to either the middle left or to the middle right square. Each of these two cases will be illustrated below. Repeat one of these two processes until the second row is complete.
Case 1: Move the bottom middle square C to the middle left square X

Fig. 13 |
Use the formula B+ L+ B− L− B− F− B+ F+. Little square C will replace little square X (little square D will automatically replace little square Y in the process).
Case 2: Move the bottom middle square C to the middle right square X
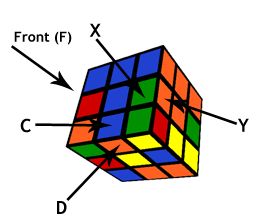
Fig. 14 |
Use the formula B− R− B+ R+ B+ F+ B− F−. Little square C will replace little square X (little square D will automatically replace little square Y in the process).
Once the first two rows are completed, we have to start aligning the bottom corners of the Cube, the 4 middle bottom cubes being fairly simple to align thereafter. Let me start with some definitions so that you may easily follow my subsequent arguments.
Bad corner
A bad corner is one which contains either only one or no colours of the little cube just above it (see below).
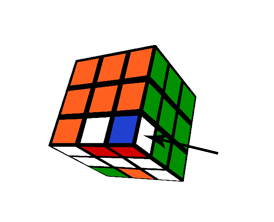
Fig. 15 |
Good corner
A good corner is one which contains the two colours of the little cube just above it. In Fig. 16, it's green and orange.
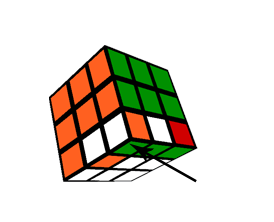
Fig. 16 |
Special corner
A special corner is one
- which contains the two colours of and
- whose bottom colour is the same as that of the left square

Fig. 17 |
Ideal corner
An ideal corner is one whose side colours are identical to those of the little cube just above it. In Fig. 18, it's green and red. The objective is to obtain 4 ideal corners before aligning the 4 bottom middle squares.
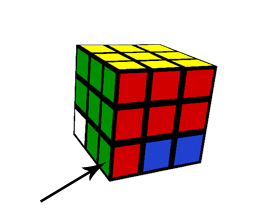
Fig. 18 |
Note
In general, after completing the second row and "appropriate" rotation the bottom row (B), you should already have at least one good corner and one ideal corner. You will be very unlucky to experience the worst-case scenario, that is, to have 4 bad corners! If that ever happens, try this magical formula: R− B− R+ B− R− 2B R+ (2B means rotating the bottom row twice - you will notice that it doesn't really matter whether rotation is clockwise or anticlockwise).
When applying this formula, hold the Cube with the two completed rows in their usual positions (for example, like in Fig. 18, with the completed face always on top). However, you can use any face as your front face.
After appropriate rotation of the bottom layer (B), you should now have one ideal corner and at least one good corner among the remaining 3.
Possible scenarios:
- One ideal and one good corner on the same face + two bad corners.
- One ideal and one good corner diagonally opposite + two bad corners.
- Two ideal corners on the same face + one good corner + one special corner.
- Two ideal corners diagonally opposite + one good corner + one special corner.
- One ideal and 3 special corners.
- Four ideal corners (our main objective to be achieved before tackling the 4 bottom middle squares, but highly unlikely at this stage).
You must have guessed that Case 1 is the worst and Case 6 is the best. I will now start with Case 1 and apply formulae until we reach Case 6. Remember that, so far, we are only dealing with the four corners of the third row.
Solutions to all possible scenarios:
- One ideal and one good corner on the same face + two bad corners.
Hold the two bad corners in front and apply the formula:
R− B− R+ F+ B− F− R− B+ R+ B−
Now rotate the bottom row (B) appropriately - you should have reached Case 2 below. - One ideal and one good corner diagonally opposite + two bad corners.
Apply the formula: F− B− R− B+ R+ F+ B−
Check the bottom row carefully - after rotating it appropriately, you should have reached one of Cases 3 or 4 below. - Two ideal corners on the same face + one good corner + one special corner.
Keep the special corner on the left of your front face before applying the magical formula:
R− B− R+ B− R− 2B R+ 2B
You must now be at Case 5 below. - Two ideal corners diagonally opposite + one good corner + one special corner.
Just like in Case 3 above, keep the special corner on the left of your front face before applying the magical formula: R− B− R+ B− R− 2B R+ 2B
You must now be at Case 5 below. - One ideal and 3 special corners.
Holding the ideal corner to the left of your front face, apply the magical formula
R− B− R+ B− R− 2B R+ 2B twice in a row.
Make sure that, after the first application, you still have an ideal corner to the left on your front face. That will take you to Case 6. - Four ideal corners (our main objective but highly unlikely at this stage).
If you have reached this stage, then you are only a few steps away from completing the Cube! From here, we will only rotate the middle column (M) and bottom row (B).
Your Cube should now be looking like the one in Fig. 19:

Fig. 19 |
Four ideal corners
In fact, it's also very possible that another face (besides the top face) is completed, that is, one or more bottom middle squares have been aligned in the process. The ideal scenario would be that all four bottom middle squares have been aligned and the Cube completed - let's stop dreaming...
From now on, depending on the configuration of the Cube, you will only be using two formulae that will not only align the bottom middle squares but also leave the top face, first and second rows, as well as the ideal corners undisturbed!
These formulae will only involve the bottom row (B) and the middle column (M). Please remember that M+ and M− works out the same way as R+ and R− in terms of clockwise and anticlockwise rotations respectively.
Formula (I): M− B+ M+ 2B M− B+ M+

Fig. 20 |
This formula leaves the front face (F) undisturbed while moving the bottom middle square X of the left face (L) to its directly opposite counterpart, that is, the bottom middle square of the right face (R) as shown in Fig. 20. Obviously, you would use this formula if the right face is white in the case of Fig. 20.
Formula (II): M− B+ M+ B− M− B− M+ B− M− 2B M+
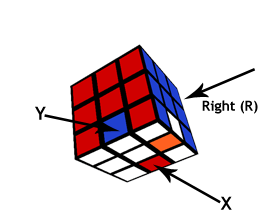
Fig. 21 |
This formula leaves the right face (R) undisturbed while moving the bottom middle square X of the bottom face to the bottom middle square Y of the front face (F) as shown in Fig. 21. Again, you would use this formula once the right face is completed and if the colour of X is the same as that of the face where Y is found.
A special case:
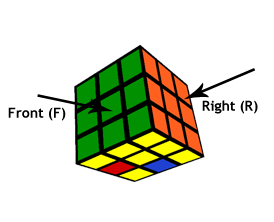
Fig. 22 |
Should you arrive at the configuration in Fig. 3 (only the top, front and right faces completed), then do the following:
- Keep (F) in front and apply formula (II):
M− B+ M+ B− M− B− M+ B− M− 2B M+ - Then, hold the Cube so that the (undisturbed) right face (R) now becomes the front face (F) before applying formula (I):
M− B+ M+ 2B M− B+ M+
Shazam!!! The Cube is complete! Congratulations! You've done it and you now belong to the small percentage of people in the world who have unlocked the 3x3x3 Rubik's Cube at least once in their lives. Please do share this page with your friends, family and relatives.